
Klib is a new way to manage highlights and notes for Kindle & Apple Books.
- Import highlights from Kindle, Apple Books or Amazon.
- Review highlights in Kindle for macOS.
- Copy highlights in Markdown format.
- Export Kindle highlights to Evernote.
]]>
Klib is a new way to manage highlights and notes for Kindle & Apple Books.

iText is an OCR tool which could recognize text from any image. You just need to capture screen or select image file, Google will extract the text inside. The recognition result is amazingly accurate, even up to 100%.

iPic could automatically upload images & files, and then save Markdown links on macOS. Support Imgur, Flickr, Amazon S3 and other cloud storage. Could compress images before upload.

iPaste is a lightweight and efficient pasteboard tool on iOS and macOS. Support text, image, file and any other formats. Could pin the history. Support multiple shortcuts.

iTimer could help you to focus on now. Use pie to show the remaining time. Could quickly start timer or restart. You can use it as Pomodoro timer.
]]>
iHosts is the only /etc/hosts editor on Mac App Store. Organize hosts by groups, switch by one click. View hosts in real time.
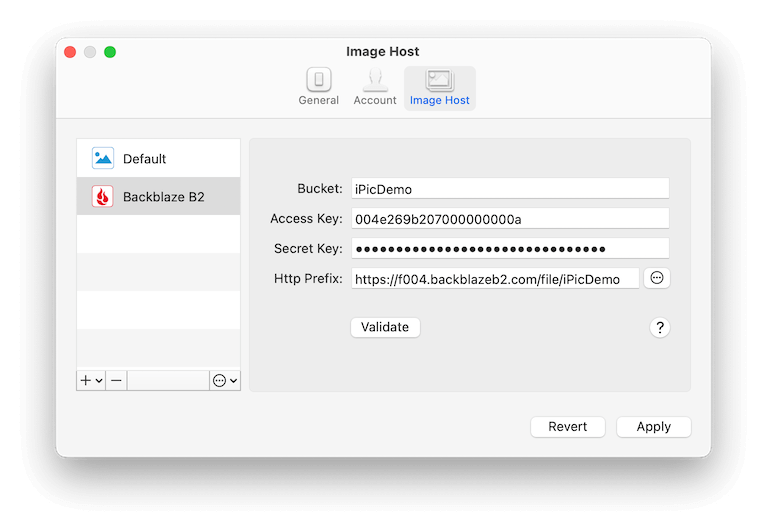
Open iPic’s Preferences, clicks Image Host, and add Backblaze B2.
Here is the introductions for all parts:
BucketBucket 时,权限需要选择 Public,不然别人无法访问,则无法作为图床使用。Bucket, should set the File in Bucket as Public, otherwise users can’t access the image in Bucket via url.Access Key and Secret KeykeyID and applicationKey of Backblaze B2 Application Key. Refer to Backblaze B2’s Application Keys.Write permission at least.Http PrefixAfter fill all the parts, clicks the Validate button. If all the information above is correct, you can see the link of Passed in the right.
Beside the basic configuration above, Backblaze B2 also supports several advanced ones. Click the ‘Advanced’ button in right of Http Prefix, you can see the following setting page.
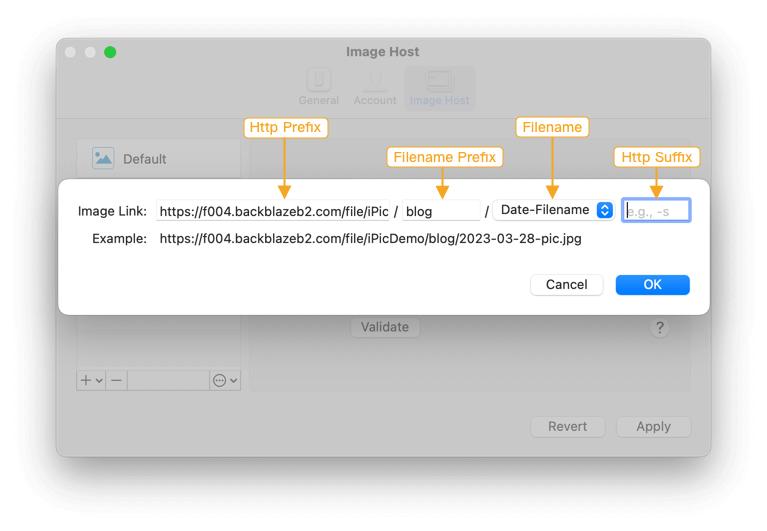
Http PrefixFilename Prefixblog folder, just input blog here. The image link will like https://f004.backblazeb2.com/file/iPicDemo/blog/pic.jpgFile name prefix when create App Key, the Filename Prefix key should includes the File name prefix at least.FilenameOnly Filename e.g., pic.jpgDate-Filename e.g., 2023-06-16-pic.jpgRandom e.g., jk8l1.jpg, could help to shorten the link.Http SuffixAfter all, clicks Apply to save.
]]>Specifically, when using iText to capture screen for the first time in macOS Catalina, the following dialog will pop up:
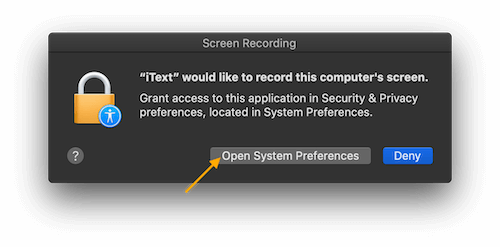
At this point, you can click “Open System Preferences”. If you ever clicked “Deny”, you can manually open the “System Preferences” app, select “Security & Privacy”, and then in the “Privacy” column, select “Screen Recording” on the left.
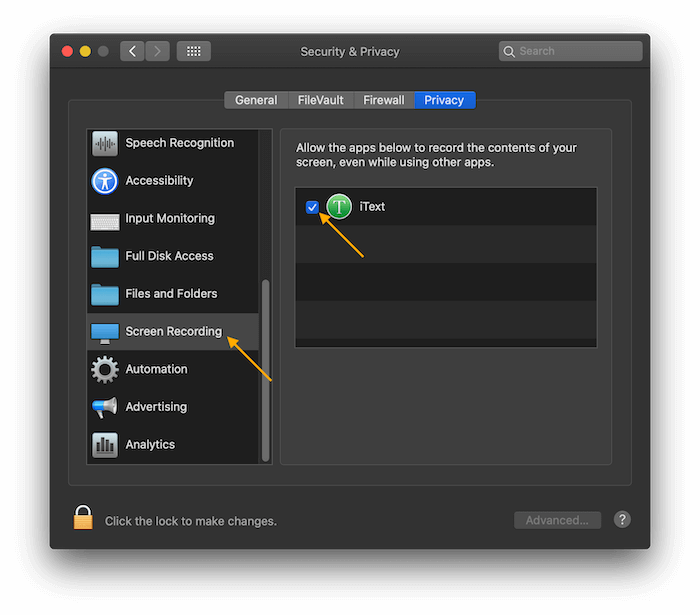
In this page, enable iText. After restart iText, it will work correctly.
]]>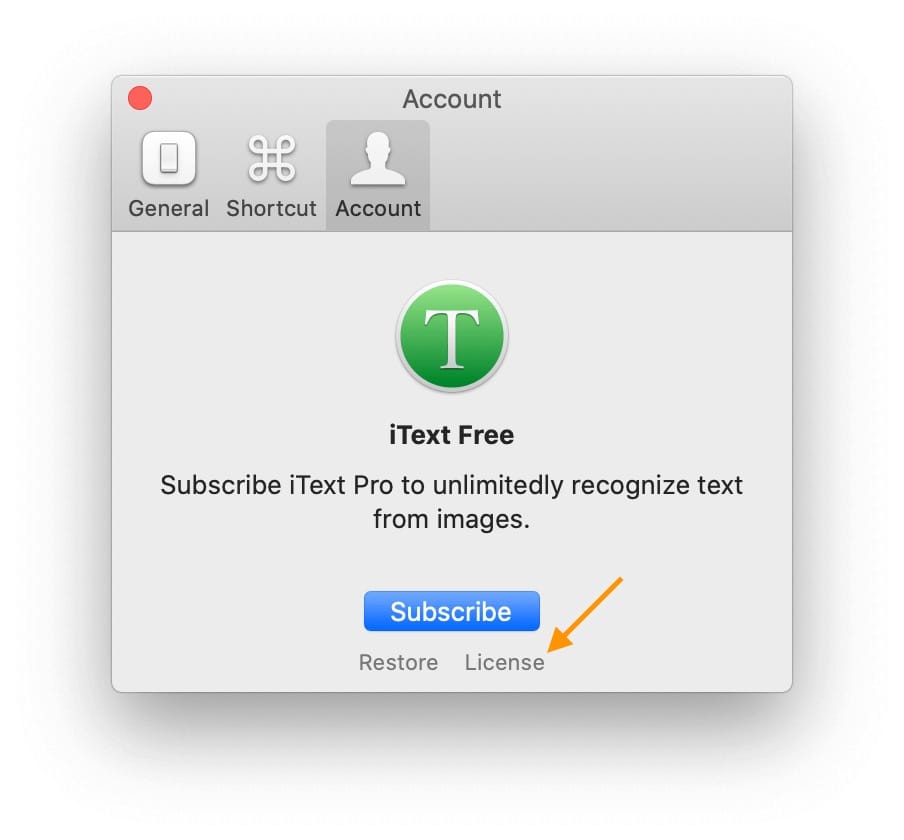
Take iText as an example, open iText's menu> More> Preferences, click Account> License, enter the license and click Activate.
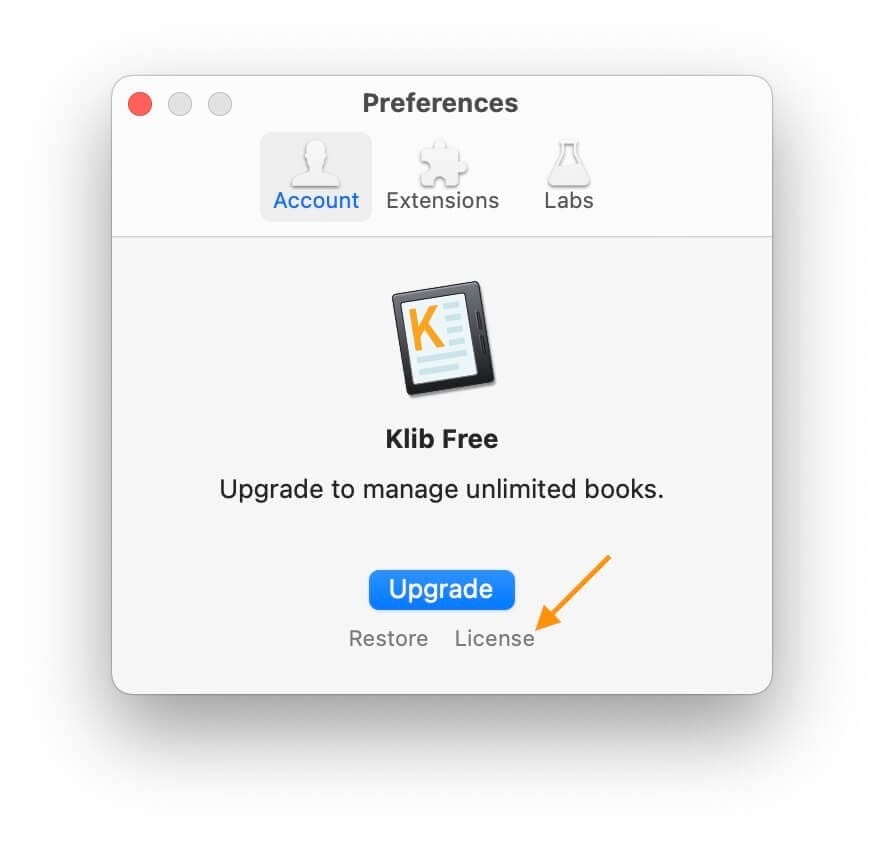
Take Klib as an example, open Klib's menu> Klib> Preferences, click Account> License, enter the license and click Activate.
Recently, after upgrading to macOS Mojave 10.14, some users may have problems clicking the iPaste history but not being able to paste it into the target program. Why and how to solve it?
Since iPaste is a sandboxed app, you cannot directly paste the clipboard history into the target app. Therefore, iPaste uses the system Script script to simulate the ⌘V shortcut to auto-paste.
It worked fine before, but macOS Mojave 10.14 imposes stricter restrictions on scripts, making the current strategy likely to fail. How to solve it? Please see the next introduction.
1. Try pasting in iPaste and save the script as prompted.
2. Try pasting again in iPaste, where iPaste will try to call the script. The macOS system will have the following prompts:
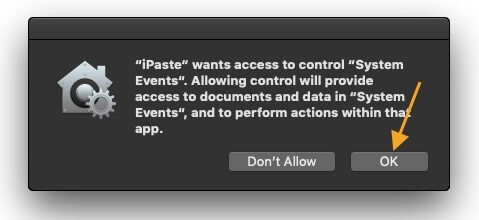
That is, macOS will let you confirm if iPaste is allowed to call the script. Naturally, you need to click OK to confirm.
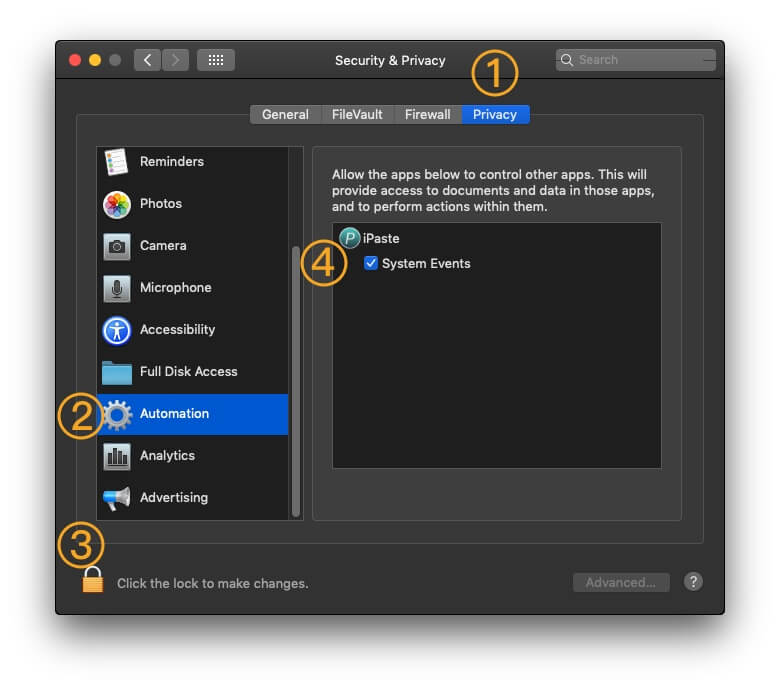
If you have previously disabled it, you need to open the system preferences System Preferences.app:

Then click Security & Privacy, Privacy, Automation, click the lock in the lower left corner, enter the password and unlock. Then select System Events under iPaste:
3. Continue to try pasting, where iPaste will call the script and try to send the ⌘V shortcut. The macOS system will have the following prompts:

That is, macOS will let you confirm if iPaste is allowed to send the ⌘V shortcut. Click on Open System Preferences (if you click Deny, you can open System Preferences.app manually), then click on ‘Security & Privacy, thenPrivacy, thenAccessibility`, click on the lock in the lower left corner and enter the password. After unlocking. Then select iPaste on the right:

4. Try to paste again in iPaste, it should be fine; you’re done.
Once the setup is complete, you don’t need to set it up again. As always, please continue to be efficient.
]]>I’m a Kindler, love to read on the Kindle. It has many benefits, but also some inconveniences, e.g. hard to export or organize the highlights, etc.
In another side, I’m an independent macOS developer. I want to develop an App to solve my problem, and also help other Kindle users. This is why I made Klib.
Let me show you how Klib works and why it’s useful.
Yes, it’s easy to take highlights on the Kindle. But in fact I didn’t feel free to do it. Why? as I know I’m likely NOT to review the highlights again, which is in fact inconvenient to do. And I’m also afraid the highlights will be lost after I deleted the books from my Kindle.
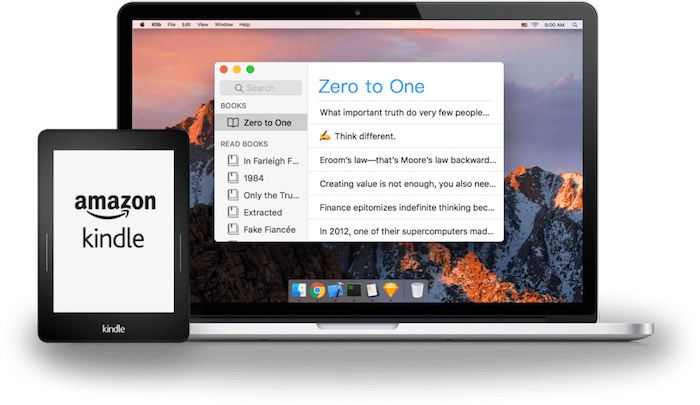
Good news is, now Klib could easily import highlights & notes from Kindle via USB, or wirelessly import from Amazon. This guarantees that the highlights I take will be safely saved in my computer, which obviously encourages me to take more highlights.
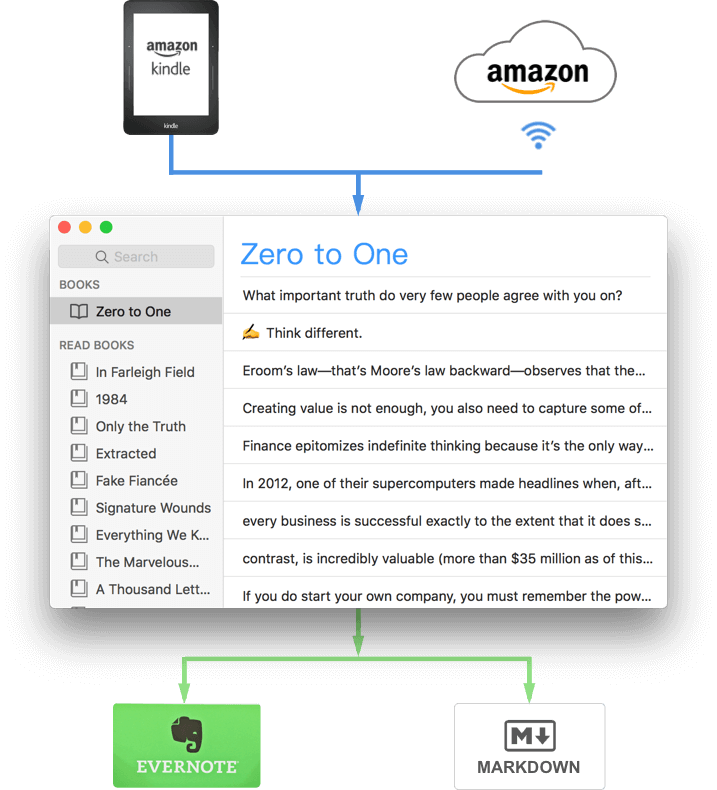
After reading a book I have a habit to summarize it in my blog. And the highlights and notes are important parts of the summary. So, I added the feature that Klib copy the highlights as Markdown. This saved me much time as I don’t need to copy and paste the highlights one by one any more.
Sometimes I want to review the highlights when my Kindle or Mac isn’t nearby. How to deal with it? I let Klib support exporting highlights to Evernote, thus I can view them via Evernote’s App for iPhone anytime, anywhere.
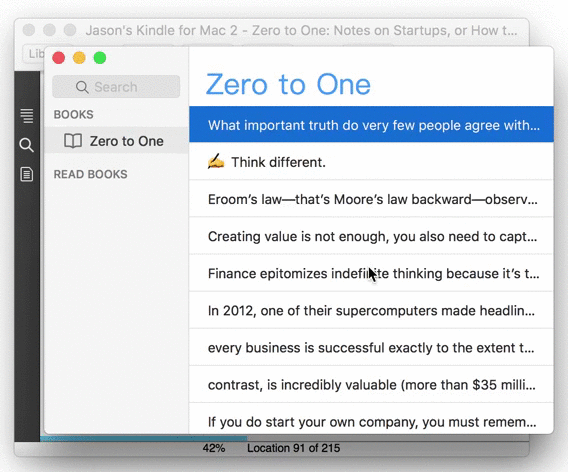
When I review highlights, sometimes I want to read that part of the book again, as the highlights are usually too brief. For this reason, I add the feature that Klib can open Kindle for macOS and jump to the exact location. Very cool and useful.
Klib should be the world’s first App which could do so.
In the same time, Klib will keep on improving, e.g. some planned improvements are:

Klib’s free account could manage 20 books. You can upgrade to Klib Pro to manage unlimited books or subscribe “Klib Extensions” to import from Amazon.
Now new version of Klib has been submitted to Mac App Store and is in review. In another side you can try Klib’s preview version ahead.
Welcome to introduce Klib to any book lovers you know. You will help them to get more out of reading. Here is the Press Kit FYI.
Please send any suggestions you may have, I will give them seriously consideration.
I look forward to hearing from you!


Klib (Kindle library) is a new way to manage Kindle highlights and notes. Learn more.
After reviewed and modified for several times, Klib was finally released on Mac App Store, and becomes the first and only Kindle highlights and notes manager on Mac App Store. Congratulations!

If you met problem or want Klib to be improved follow your ways, please feel free to contact me.
Look forward to your message.
]]>
Did you ever meet these troubles?
1. Upload images to cloud, and then update link in Markdown
2. Change image host
3. Transfer images when change WordPress to Markdown
4. Compress existing images
In another side, iPic Mover could help you to easily transfer images in Markdown to new image host.
Have a look at this gif first:
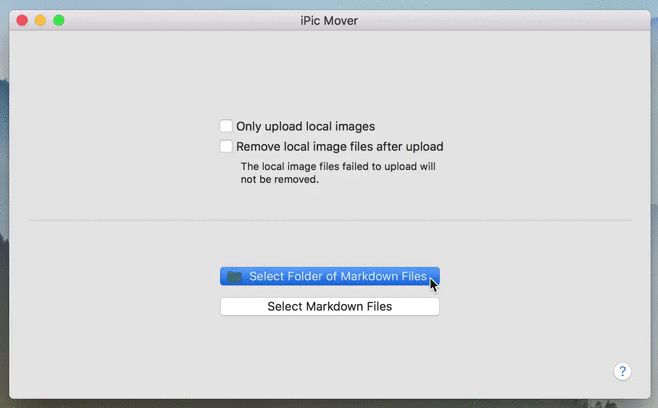
You only need to select the folder of Markdown files, iPic Mover could help you to:
There’re some other options:
iPic Mover could sort images by size. This could help you to quickly find the big images, and then replace or compress them to reduce traffic of your sites.
In fact iPic Mover calls iPic to upload images to the selected image host in iPic. Check more details about iPicUploader in this blog:
iPic Opens Upload API: iPicUploader
>>> Click to Download iPic Mover <<<
Have a try now!
Any suggestions, welcome to chat with me. Looks forward to your feedback.
]]>
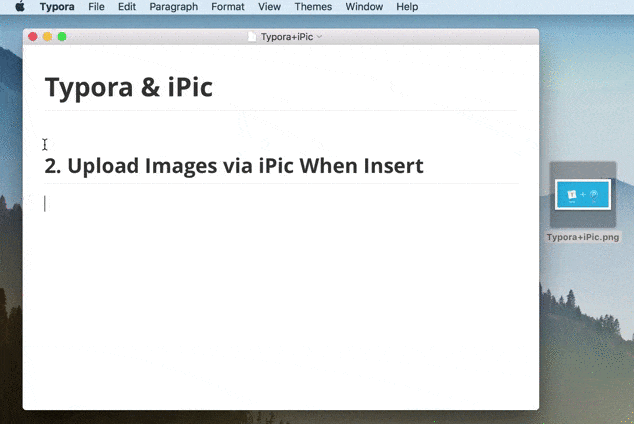
Now, Typora‘s user could easily insert images in Markdown with iPic’s help.
If you already insert local images in Markdown, you could easily upload them to Cloud with one click.

If you enable this option, when you insert local images, Typora will automatically upload them to Cloud and replace the link.
iPic opens the ability to upload images. It means if your App also needs to upload images, no need to build from scratch. Just use iPicUploader, your App could also upload images to Imgur, Flickr, Amazon S3 and other image hosts.
Typora is the first Markdown editor integrate with iPicUploader.
If you also want your favorite Markdown editor supports upload images by drag & drop via iPic, just contact me or the editor’s team. Hope all of us could easily insert images in Markdown.

iPic could automatically upload images and save Markdown links on macOS.
Download iPic and have a try.
iPic opens the ability to upload images. It means if your App also needs to upload images, no need to build from scratch. Just use iPicUploader, your App could also upload images to Imgur, Flickr, Amazon S3 and other image hosts.
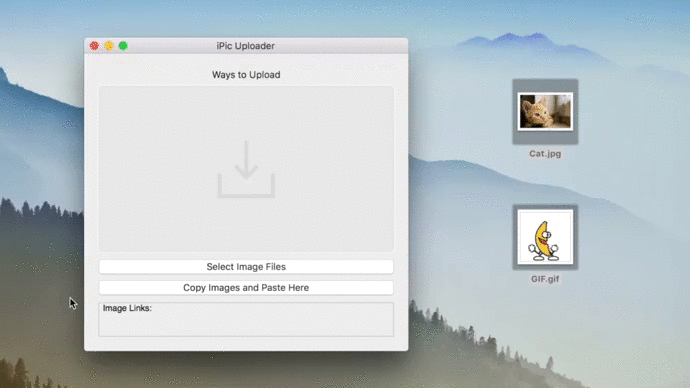
Upload image file:
|
|
Upload image data:
|
|
Upload NSImage:
|
|
iPicUploader also includes a full example. You will feel easy to start. To run the example project, just clone current repository and open iPicUploader.xcworkspace.
Note:
Now, let’s have a look how the example upload images.
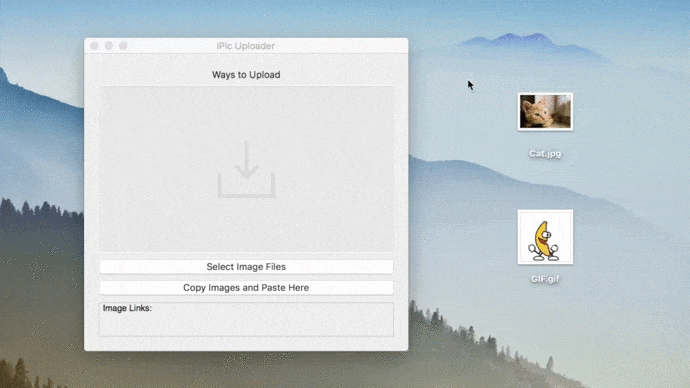
As you can see, iPicUploader support uploads multi-images at a time.


Beside copy image files, you can also copy the image in other Apps to upload.
As iPic runs on macOS 10.11 and newer version, iPicUploader also needs macOS 10.11+
iPicUploader is available through CocoaPods. To install
it, simply add the following line to your Podfile:
|
|
iPicUploader is available under the MIT license.
]]>Open iPic’s Preferences, clicks Image Host, and add Amazon S3.
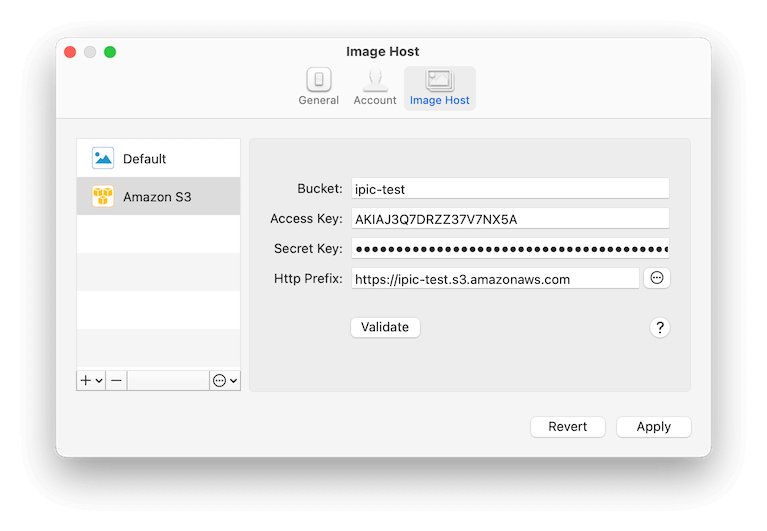
Here is the introductions for all parts:
BucketAccess Key and Secret Key
Http PrefixAfter fill all the parts, clicks the Validate button. If all the information above is correct, you can see the link of Passed in the right.
Beside the basic configuration above, Amazon S3 also supports several advanced ones. Click the ‘Advanced’ button in right of Http Prefix, you can see the following setting page.
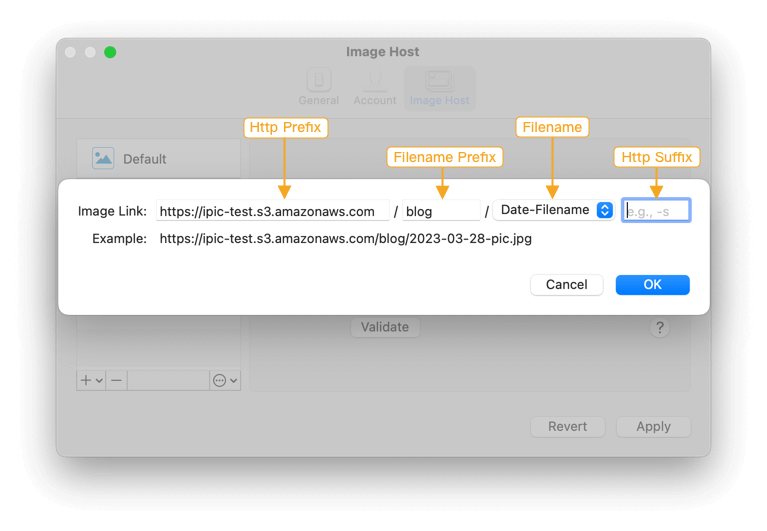
Http PrefixFilename Prefixblog folder, just input blog here. The image link will like https://ipic-test.s3.amazonaws.com/blog/pic.jpgFilenameOnly Filename e.g., pic.jpgDate-Filename e.g., 2016-06-16-pic.jpgRandom e.g., jk8l1.jpg, could help to shorten the link.Http SuffixAfter all, clicks Apply to save.
]]>2018/03/29
2017/10/23
2016/05/19
2016/12/21
2016/10/18
2016/08/29
2016/08/21
2016/08/01
2016/07/01
2016/07/01
2016/06/29
2016/06/27
2016/06/22
2016/06/11
2016/05/31
2016/05/25
2016/05/17

iHosts, perfect for editing /etc/hosts on Mac, was recommended by many Japanese sites, e.g.,
Use iHosts to organise your /etc/hosts now for free now!

Please help to give 5 stars to iHosts if you think it’s good. Thanks in advance.
]]>2016/12/28
2016/09/26
2015/12/15
2015/12/05